
The little case I showed you guys last time is pretty easy to make, so now I'll show you how! Oh, and I'll just go ahead and apologize right now for the terrible photos. I'm not sure if my photography skills have improved in the last few months or it's the new camera we recently acquired, either way these shots aren't so hot.

Materials you'll need:
* Plastic container- this can really be any type of container. Even the clear deli take-out kind will work, (although I have a different method for that kind, I'll share with you later.) you just have to be more conscious of your jump stitches.
*Embroidery Patterns- I used Sublime Stitching's Dress Up patterns. I also used a photocopy since I would be chopping it up and writing on it.
*Embroidery Floss and normal stitching stuff like needles- Duh, you already knew that!
*Drill- with a 1/16 drill bit (teeny tiny!)
* Tape- for your pattern and reinforcing your container if it's on the flimsy side.
*Scissors
*Pen/Sharpie
Optional Stuff:
*Beads
*Rotary Tool- Sandpaper will probably work just as well.
*Transfer Paper
*Felt (with hot glue)
*Scrapbook Paper (with glue stick)
Let's get started!
I wrapped the whole jar with masking tape to reinforce it while I was drilling. I wasn't sure if the plastic would take it well. It was probably unnecessary, however, it also helped with the transfer method so it wasn't a total bust. I also taped my lid down so it was more secure when drilling.


*Tip- If you have a particularly sturdy container or lack transfer paper, you can probably just tape your pattern to the jar and drill right through it. I just like to plot out my holes first. You'll see....
Okay, so at this point I plotted out where the hole for each stitch would go. I find this part helpful so that I can make sure that two holes aren't to close together. (Notice how I crossed one out?) Plus, I would probably just start drilling, willy-nilly, that usually doesn't end well around here.

Notice on this one, I had to adapt the pattern a wee bit based on what the plastic would allow. Keep that in mind when you're plotting out your stitches.
Now it's time to drill, baby, drill. (Ewwww, did I just quote Sarah Palin? Gross. I'm sorry, it won't happen again.) I didn't take a picture of this step, but I think you can handle it ;) Just be sure to be safe- wear those silly looking goggles! Also, hold the container securely, taking special notice to the placement of your fingers so you don't drill yourself. You want those fingers to be ready for stitching in just a few minutes.
Here's where the rotary tool comes in. On the inside, where the holes are, there were lots of little plastic burrs. I sanded them down with the rotary tool so that it wouldn't snag my floss.


*Embroidery Floss and normal stitching stuff like needles- Duh, you already knew that!
*Drill- with a 1/16 drill bit (teeny tiny!)
* Tape- for your pattern and reinforcing your container if it's on the flimsy side.
*Scissors
*Pen/Sharpie
Optional Stuff:
*Beads
*Rotary Tool- Sandpaper will probably work just as well.
*Transfer Paper
*Felt (with hot glue)
*Scrapbook Paper (with glue stick)
Let's get started!
I wrapped the whole jar with masking tape to reinforce it while I was drilling. I wasn't sure if the plastic would take it well. It was probably unnecessary, however, it also helped with the transfer method so it wasn't a total bust. I also taped my lid down so it was more secure when drilling.

To transfer the pattern I used a scrap of Saral Transfer Paper. (Most of my fellow stitchers know how much I love this stuff. I carry on about it in our forums all of the time!) I tape the pattern onto it and traced it with a ballpoint pen. Easy Peasy.

*Tip- If you have a particularly sturdy container or lack transfer paper, you can probably just tape your pattern to the jar and drill right through it. I just like to plot out my holes first. You'll see....
Okay, so at this point I plotted out where the hole for each stitch would go. I find this part helpful so that I can make sure that two holes aren't to close together. (Notice how I crossed one out?) Plus, I would probably just start drilling, willy-nilly, that usually doesn't end well around here.


Here's where the rotary tool comes in. On the inside, where the holes are, there were lots of little plastic burrs. I sanded them down with the rotary tool so that it wouldn't snag my floss.

*Tip- if your container is completely clear or you don't have a rotary tool, snip the burrs as close as possible with sharp, pointy scissors. I don't think the snags will actually cut your floss, just makes it irritating.
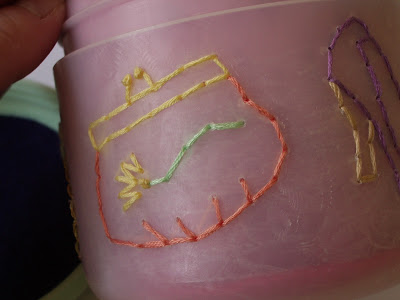
Since my container was frosted, my sand marks on the inside were visible. So I did the outside too. It's most evident in this photo.

Now, stitch! I used all six strands of floss for the designs and just knotted it at the end. When it was time to finish off a color or design, I simply ran the needle with floss back through a few existing stitches on the inside. Since I was using the back stitch there is enough floss in the back side to keep it nice and secure.
As for the optional stuff, it's really just to gussy it up. I added beads to some of the designs.

To cover the stitches, I added felt and scrapbook paper.

For the paper, I just made 2 tubes, one with the design on the inside. The other with the design on the outside. (The outer one is so there is a pinkish tone showing through the frosted plastic. It looked better with the sanding.) I put one inside the other, squished it up and let it open back up once it was in the jar. Since I didn't glue the paper into the jar itself, since the glue would have shown on the sides, I added a circle of felt at the bottom. This keeps the paper from moving around too much.

That's it! Lots of little steps, but pretty easy. I hope that this tutorial is clear, if not, please let me know. Don't hesitate to ask me questions, I don't mind at all.
So now that you know the secrets, I hope that you can find even more stuff to stitch around your house. This ability is especially helpful when you're broke...trust me. If you make something with the tips I've shared, I'd love to see. Crafty geeks....unite!
Enjoy a craftastic day! And don't forget to recycle :)
8 comments:
you are so dang clever!
Thanks, Alyssa! You should try it, soooo easy.
As for the deleted comment, pretty sure it was spam. Has anyone noticed that spam nowadays is starting to incorporate somewhat relevant, but not quite on point, comments? Damn you, spyware!! Lolz.
Very cool!
oh yes!!!! look at you bust'n out the drill!!! You know I love this!!!
Thanks! I love that drill, actually. Despite the fact that it was a gift for the guy, I'm always happy I made that purchase:)
I can't wait to do this! I wanted to let you know a trick we use in jewelry making to get rid of the burrs after drilling a hole. Take a larger drill bit and twist it a few times on the hole with just your fingers. It sort of counter-sets the hole and removes all the burrs. Happy stitching!
Thanks, Merr! I'll have to try that next time I'm stitching through plastic!
Post a Comment